Article content
Kitchen peelers are available in all shapes and color combinations. But there is one thing everyone who spends a lot of time in the kitchen knows. It’s not at all easy to come across the right one that will suit us. Some prefer a single-sided one, others prefer a peeler that has several sides and can be used to grate everything from carrots and garlic to potatoes for potato pancakes. If you finally found the right one, another problem will appear after a few years. It will stop serving you well. And then what?
You will never have to throw a peeler away again
Most people consider a peeler a kind of disposable item. They will simply use it until it serves. And then they just throw it away and buy a new one. But if you count among those who don’t like to waste or simply don’t want to give up your favorite peeler, today’s article is made for you. We have put together a procedure on how to sharpen a peeler so that it becomes sharp again and works like new. Impossible, you say. Usually knives or scissors are sharpened. But believe it or not, a peeler can be sharpened too. You will need
- sandpaper
- 10–15 minutes of your time
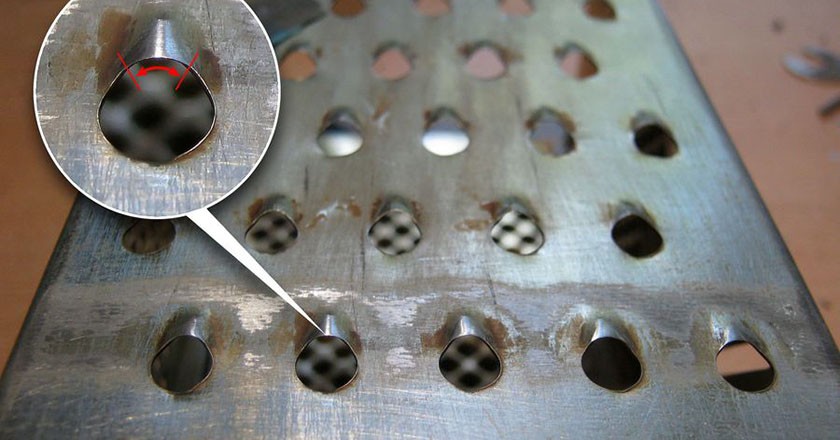
How to quickly and easily sharpen a peeler
That doesn’t look complicated, does it? Cut off a small piece of sandpaper. A strip about six centimeters long and two centimeters wide will be enough. Now place the peeler on a surface and gently start sliding the sandpaper over the surface of the peeler. Try to go over every sharpened tooth so you sharpen it evenly. Depending on the size, the whole process should take you no more than ten to fifteen minutes. Of course, it depends on how many sides your peeler has.
We guarantee that the result will literally take your breath away. Not only will the peeler literally shine, it will also grate exactly like new. Try this method and let us know how satisfied you are with it. Don’t forget to share it with your friends. And watch your fingers!