Article content
This is the simplest and cheapest way to root grapevine from cuttings. Remember these few rules and you will never have to buy seedlings again.
How to reliably root grapevine
We need:
- vine cuttings
- a one-liter container
- water at room temperature
- a sharp knife
- wax
- a 500 ml plastic container
- substrate of humus and garden soil (1: 1)
Procedure:
1. First of all it is important to know that the preparation of grapevine should be done between February 20th – 25th.
2. Pour a little water into the glass where you will place the cuttings. The water should be about 1 cm high. If you pour a lot of water, roots will develop on only 10 – 15% of the selected cuttings. If you cannot constantly monitor the water in the glass, place a cotton cloth about 1 cm high on the bottom. This will allow you to maintain the optimal level of moisture for several days. It is important that the cuttings do not dry out, so they must not be left without water!
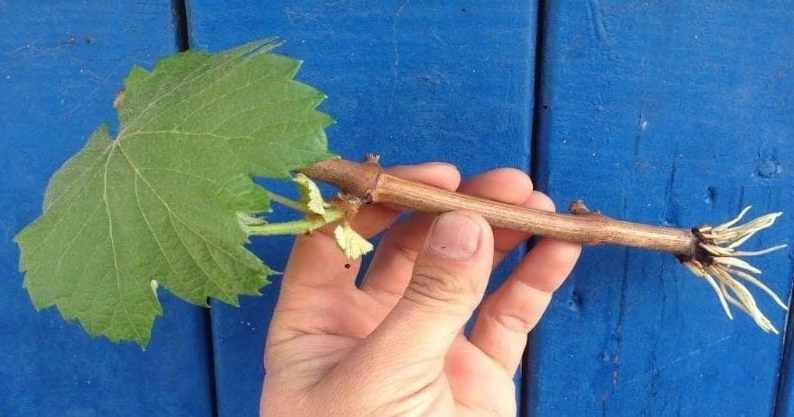
3. This is how to properly prepare them: the lower end of each stem should be cut 1.5 cm below the buds. This means that the end will be in the water and the buds above it.
4. Each stem should have 2 – 3 buds. Its upper end should be 4 to 5 cm above the top buds.
5. After preparing the cuttings remove the lower buds and make 3 – 4 shallow longitudinal cuts from the place where the lower buds were located. Roots will sprout from these parts of the stem.
6. Insert the prepared stem into a container with water.
7. Prepare as many cuttings as you need in a similar way.
8. When we have the cuttings prepared like this with the lower ends soaked in water, it is essential to cover the upper ends with wax. Otherwise the rooting rate will be much lower.
9. Place the container with the cuttings in a warm and bright spot (for example on a south-facing windowsill). Wait for the roots to appear. They appear approximately on days 21 – 30 after soaking in water (buds sometimes begin to develop earlier).
10. The fourth rule is that the cuttings should not be kept in the glass of water for too long. When they already have roots about 5 mm long, plant them into plastic cups. Otherwise, long roots will begin to break and the final result will be unfavorable.
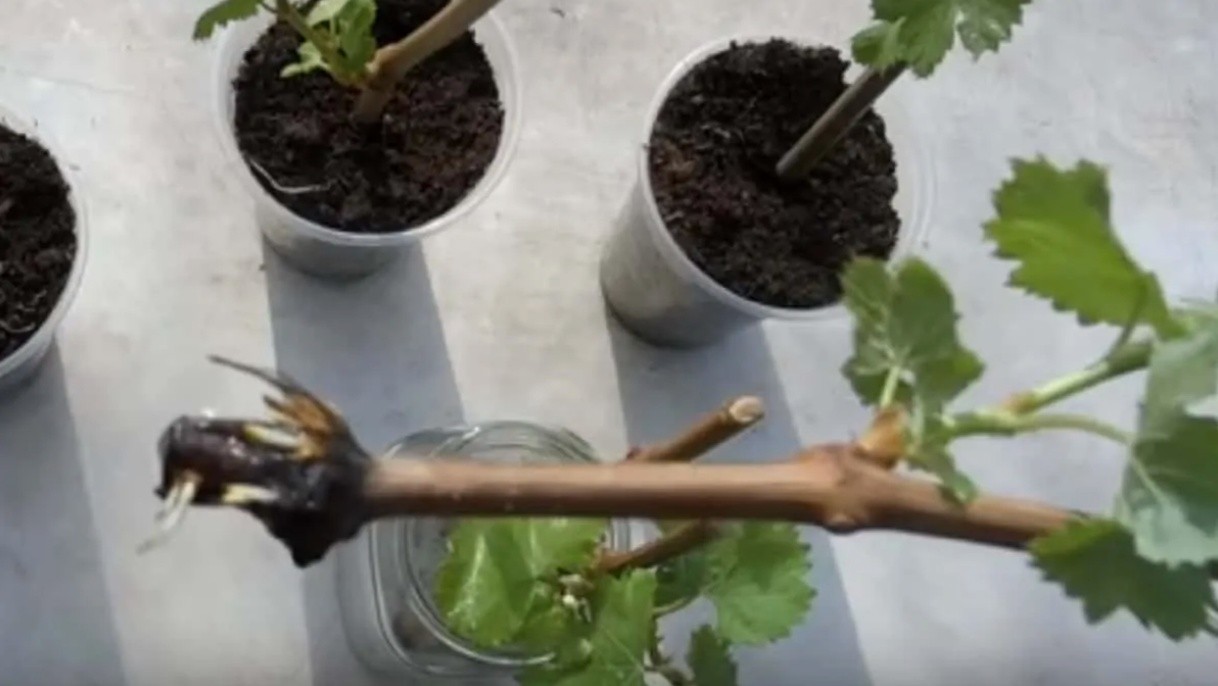
For example this cutting was in water for 45 days and its roots are already too long.
11. Make a drainage hole in each plastic cup. Then fill it with substrate. Make a hole in the center into which you will plant the seedling and press the substrate firmly around it.
12. After planting, water the cuttings abundantly with standing water so that air bubbles in the substrate collapse and the substrate adheres to the roots. Excess water will drain out through the drainage hole.

13. The fifth rule is that the leafy shoots that develop on the cuttings need to be removed regularly. But beware!
Be careful not to break the growing point.
Wait until the leaves at this level are sufficiently large and only then remove them.
14. If the cuttings have already been in the cup for 1 – 1.5 months (maximum), you should plant them in the garden (do not forget to water them regularly during development in the cup). However, a week before this event they must undergo adaptation to the outside environment. On the first day leave them outside for 60 minutes, on the second day 2 hours, on the third day 3 hours … etc. On the seventh day leave them outside for 7 hours. If you do not perform this process, the cuttings’ leaves will simply fade and dry out.
The seedlings should be allowed to go through the growth process like this to become sufficiently prepared and resilient. In the first year they will then grow well and withstand even cooler weather. In the second year a strong bush will form and in a short time you will be able to enjoy a plentiful harvest!